
HOW TO USE
Components (What’s in the Box?)
The XerosGuard Starter Pack includes:
- 2x Large size patented autoclavable cheek retractors (one regular size external U-Bar and one expanded U-Bar);
- 1x Small size patented autoclavable cheek retractor;
- 25x Patented single-use tongue cribs with integrated suction tubes and Y-adapters.
Assembling XerosGuard
There are three components to the XerosGuard proprietary cheek retractor.
- A right lip cradle (labeled R)
- A left lip cradle (labeled L)
- U-bar connector (metal arm)
- Connect the right and left lip cradles to the U-bar connector via the key interlock.
Engage the lip cradle to the U-Bar connector via clockwise or counterclockwise
rotation. - Once the cheek retractor is assembled, make any pre-adjustments necessary to the
tongue crib with integrated suction (see ‘Insertion and Removal’) and connect the
tongue crib to the cheek retractor by sliding the suction tube arms through the
channels of the now assembled cheek retractor.
Disassembling XerosGuard
- Disconnect the tongue crib with integrated suction tubing from the channels located on the cheek retractor. The tongue crib is intended for single patient use and should be discarded to prevent patient cross-contamination.
- The components of the cheek retractor are made of a highly heat-resistant
material that can be steam autoclaved and reused. Please disengage the lip
cradles from the U-Bar connector via clockwise or counterclockwise rotation
prior to washing and sterilizing for optimal infection control.
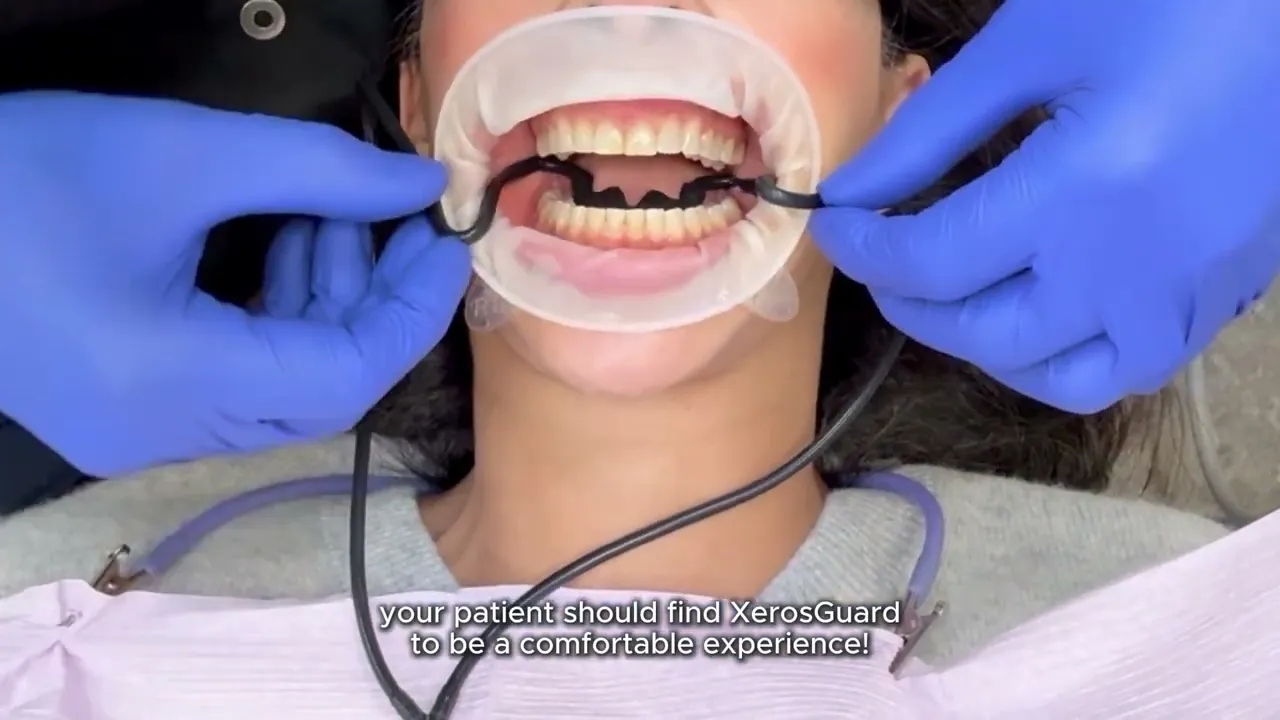
Insertion (Post-assembly)
- Please view the ‘Insertion’ video on adapting the tongue crib with integrated
suction to your patient prior to insertion - Now you’re ready to insert XerosGuard into your patient’s mouth. You may wish to
consider placing some petroleum jelly or lip moisturizer on your patient’s lips to
maximize their comfort. - Insert the XerosGuard in one piece. Run your finger along the commissure to
ensure the retractor cradles your patient’s lips. - Now examine the suction arms and tongue crib. The suction arms should wrap
around the distal of the terminal teeth and the suction ports should sit on the
retromolar pads. The tongue crib should encase the tongue. It’s sometimes helpful
to ask your patient to “stick their tongue into the crib”. Also, ensure the sublingual
suction ports are free and clear of sublingual mucosa by running your finger
along the sublingual of the tongue. - If you have done this correctly your patient should be able to comfortably bite
down into maximum intercuspation. Ask your patient if they are biting on anything
(if they are not) you have successfully inserted the XerosGuard. - If not, adjust the poseable suction tube arms until this is the case. Don’t forget to
check the suction tube ports again if you have modified the suction tube arm
positioning. - Finally, attach the Y-adapter to your chairside suction and turn on your suction.
You should hear the intra-oral fluid starting to be evacuated. Adjust the strength of
suction to meet your needs.
- Once you have finished your procedure remove the XerosGuard in one piece.
- Disconnect the patented single use tongue crib with integrated suction from the XerosGuard and dispose of it.
- Retain the cheek retractor component and sterilize it with your other equipment. You may wish to dissemble this piece for space considerations in your autoclave.
Infection Control
- Here at XerosGuard, the health and safety of the patients and operators are of the highest priority.
- To eliminate any chance of cross-contamination, any portion of the XG appliance
in direct contact with the patient’s fluids or foreign debris which cannot be
mechanically cleaned or directly steam sterilized (such as the tubing running
throughout the XG appliance) are single patient use - The cheek retractors and bite blocks can be safely sterilized via stream autoclave following mechanical debridement in a machine wash.
- The basic principle of steam sterilization/autoclave is to expose each item to direct steam contact at the required temperature and pressure for the specified time. Thus, there are four parameters of steam sterilization: steam, pressure, temperature, and time. Pressure serves to obtain the high temperatures necessary to quickly kill microorganisms.
- Specific temperatures must be obtained to ensure the microbicidal activity.
- The two common steam-sterilizing temperatures are 121°C (250°F) and 132°C (270°F) These temperatures must be maintained for a minimal time to kill microorganisms.
- Recognized minimum exposure periods for sterilization of wrapped healthcare supplies are 30 minutes at 121°C (250°F) in a gravity displacement sterilizer or 4 minutes at 132°C (270°F) in a pre-vacuum sterilizer.
- At constant temperatures, sterilization times vary depending on the type of item (e.g., metal versus rubber, plastic, items with lumens), whether the item is wrapped or unwrapped, and the sterilizer type.
Recommendation For Cheek Retractor Is Steam Autoclave (6 Critical Factors)
- Time (15 to 30 min)
- Temperature (121-132°C)
- Moisture
- Direct Steam Contact
- Air removal
- Drying
Sterilization Protocols for Tongue Crib with Integrated Suction
- Recommendation is to discard after single use
HOW-TO VIDEO
Adjustment & Bends Tutorial
HOW IT HELPS
What Does It Do?
Xerosguard performs all of the tasks of a high-suction evacuator, bite block, tongue shield and oral pathway protector in one easy-to-use device. It’s an intelligent breakthrough in isolation that brings unmatched levels of ease and comfort to doctors and patients alike.
What Does It Do For Me?
Xerosguard helps to keep your work environment dry, clean and visible. By removing the normal barriers to getting your work done without a flurry of motion from your dental assistant, you’ll be able to work more efficiently. Xerosguard frees you to work without constraints, while your assistant stays steps ahead, streamlining each procedure. You’ll enjoy a more productive office environment and have even more satisfied patients. Xerosguard will also pay for itself patient after patient by allowing you to do two-quadrant dentistry and reducing chair time.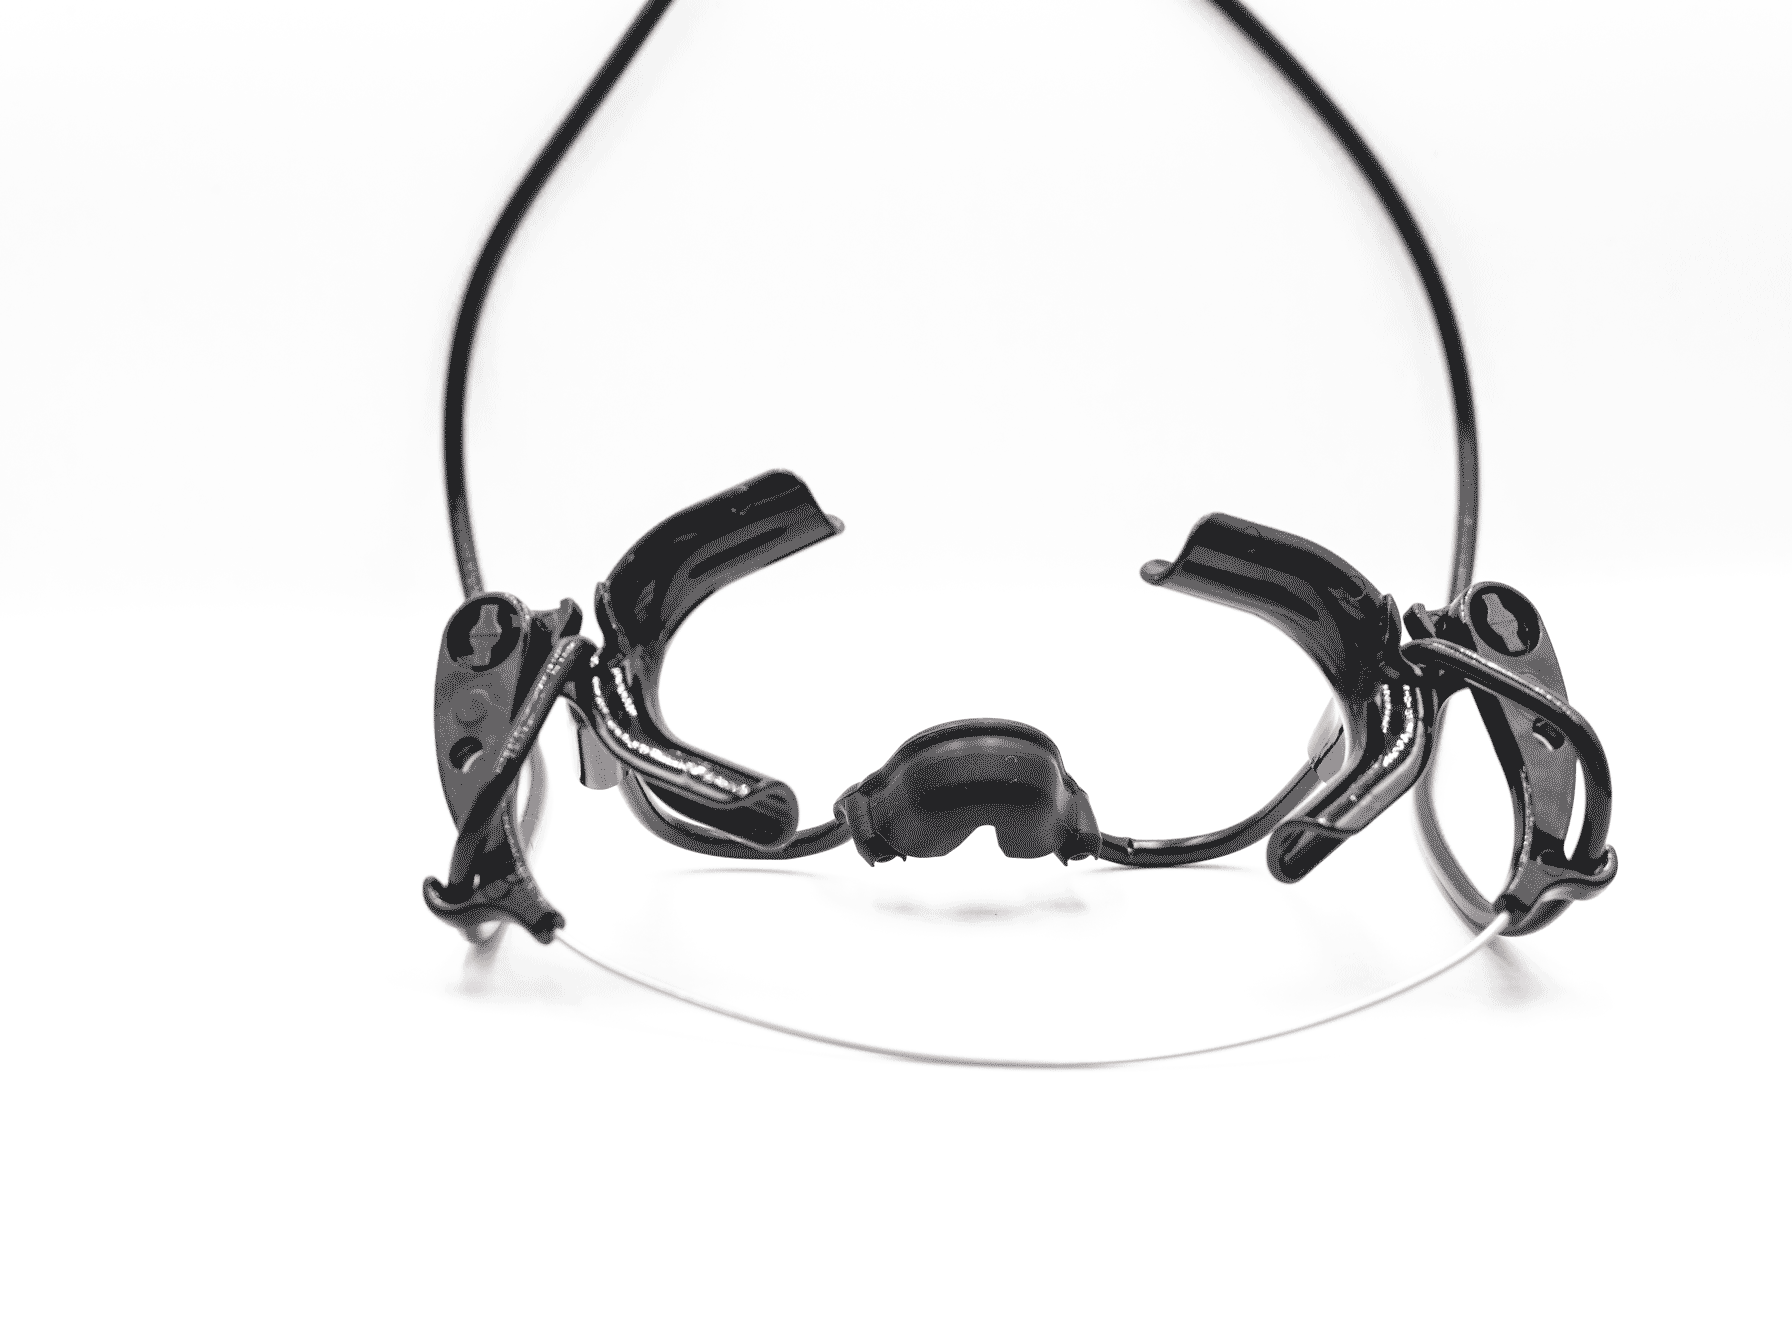

HOW IT WORKS
ASSEMBLY
Lorem ipsum dolor sit amet, consectetur adipiscing elit. Ut ut efficitur erat. Orci varius natoque penatibus et magnis dis parturient montes, nascetur ridiculus mus. Mauris ultrices nisl ac elit maximus, vel imperdiet nisl vulputate.
INSERTION
Lorem ipsum dolor sit amet, consectetur adipiscing elit. Ut ut efficitur erat. Orci varius natoque penatibus et magnis dis parturient montes, nascetur ridiculus mus. Mauris ultrices nisl ac elit maximus, vel imperdiet nisl vulputate.
REMOVAL
Lorem ipsum dolor sit amet, consectetur adipiscing elit. Ut ut efficitur erat. Orci varius natoque penatibus et magnis dis parturient montes, nascetur ridiculus mus. Mauris ultrices nisl ac elit maximus, vel imperdiet nisl vulputate.
STERILIZATION
Lorem ipsum dolor sit amet, consectetur adipiscing elit. Ut ut efficitur erat. Orci varius natoque penatibus et magnis dis parturient montes, nascetur ridiculus mus. Mauris ultrices nisl ac elit maximus, vel imperdiet nisl vulputate.
HOW TO GET HELP
We’re here for you.
Get answers to common questions or reach out to friendly team.
